Handy Git Recipes
Git is one of these things I use on a daily basis, yet I’ve never felt like I truly mastered it.
There’s so many things you can do with it, and so many ways to do them, that it’s easy to get lost in the sea of commands and options.
Truth be told, just a couple of them are enough to leverage 90% of the power of git repositories and cover the main
needs of developers. That remaining 10% can be quite useful during complex workflows.
I’ve put together some explanations of the most commonly used terminology and commands, as well as some recipes which
I often find myself using at work. I hope you’ll find them useful too. For the record, at the time of this writing
I was using git version 2.37.0.
Basics
Commits
A commit is a snapshot of all the tracked files in your project. It contains the changes made since the previous commit, along with metadata such as the commit author, timestamp, and a message describing the changes. Commits are organized sequentially, each commit pointing to its parent commit. This is how git records the history of a repository. Think about it in terms of inheritance, instead of time: a commit inherits the changes of its parent commit, and adds its own changes on top of them. Everything in git is relative to something prior. More formally, commits are organized as a directed acyclic graph. This way, it is easy to traverse the history of a repository and do all kinds of useful operations on it.
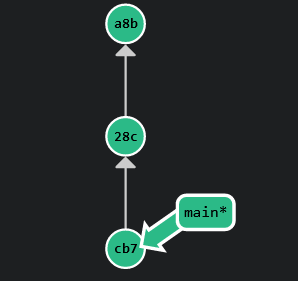
Every commit is identified by a unique hash (SHA-1), which is a 40-character hexadecimal string. When working with commits, it’s rarely necessary to
reference them by their full identifier. You can pass in only a prefix (first 7 characters should be enough) and
git is smart enough to figure out the rest (as long as there exists only one commit with the given prefix). For example, let’s consider
commit dc2727cdfe357e4caf40f9c79c35d5232195ca45
from this blog’s repository. You can check the metadata associated with it
by running git --no-replace-objects cat-file commit dc2727c. The output is:
1 | tree 2f3a693e39a75ae5e393c226c17895e6136d2d72 |
That is:
- The source tree: SHA-1 hash of the tree object representing the repository’s file structure at the time of the commit.
- Commit parent(s): The SHA-1 hash(es) of the commit parent(s). A commit can have multiple parents in the case of a merge commit (more on this later).
- Author: the name and email address of the person who authored the changes, along with the commit timestamp.
- Committer: the name and email address of the person who made the commit, along with the commit timestamp. This might be different from the author if the changes were committed by another person, see this commit for example.
- GPG signature: this is optional, and can be used to verify the authenticity of the commit. It is generated using the author’s private key, and can be verified using their public key.
- Commit message: the text of the commit message.
All that information is combined and hashed using the SHA-1 algorithm to produce a unique commit identifier. Just for fun, here’s how you can generate it yourself:
1 | (printf "commit %s\0" $(git --no-replace-objects cat-file commit dc2727c | wc -c); git cat-file commit dc2727c) | sha1sum |
For an explanation of the command above, check out Carl Mäsak’s gist. And finally,
to inspect the changes introduced with this commit, you can run git show dc2727c.
Before committing, the usual workflow is to add your changes to the staging area.
1 | git add . |
The above was used to generate commit a561329.
You may also use the shorthand git commit -am "explaining git", which will automatically stage all changes before committing them.
However, note that this command will add and commit all the modified files, but not the newly created ones. Eventually,
you’ll want to run git push to publish your changes to the remote repository.
Branches
A branch is a pointer to a commit. When a new branch is created, it points to the same commit as the branch
it was created from. In other words, it is a “copy” of the current branch.
When you commit to a branch, the branch pointer is updated to point to the new commit.
The default branch of a repository is usually called main or master.
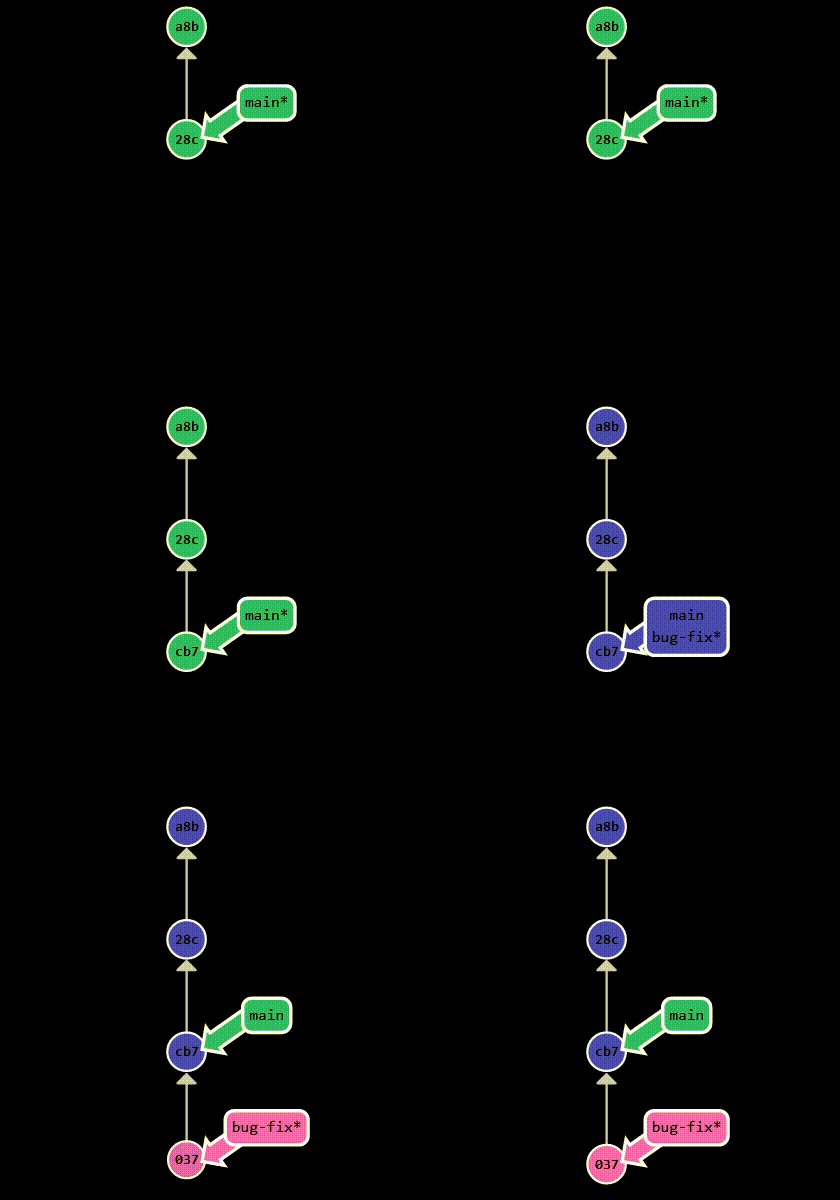
Creating a new branch is done by running git branch <branch-name>. To switch branches, run git checkout <branch-name>.
These two steps are usually done together, so there’s a shorthand for it: git checkout -b <branch-name>. Alternatively, you can
use git switch <branch-name> to switch to an existing branch, or git switch -c <branch-name> to create a new branch and
switch to it. git checkout is a versatile command with multiple use cases, while git switch was introduced only
to facilitate branch operations. The recommended way is to go with git switch, as it has a more intuitive syntax. In the
example above, I create a new branch called bug-fix and switch to it. After making some changes, I commit them:
1 | git switch -c bug-fix |
If I change my mind and decide to delete the branch, I have to switch back to main first and then run git branch -d bug-fix.
Note that, as a safety precaution, this will only work if the branch has been merged into another branch.
If you want to delete a branch that hasn’t been merged yet, you can use git branch -D <branch-name>.
Also, deleting a remote branch is done by running git push origin --delete <branch-name>. Always be cautious when deleting branches,
as you may lose work that hasn’t been merged yet. One other thing, renaming a branch is easy: switch to it and run git branch -m <new_branch_name>.
Remotes
While working with git, you’ll notice the term remote being used everywhere. A remote is a copy of the repository that is hosted elsewhere (on Github, for example).
You can have multiple remotes, and you can push and pull changes to and from them. The default remote is called origin, and it’s
essentially a shorthand name for the remote repository’s URL:
1 | git clone git@github.com:apetenchea/cdroot.git |
In this particular case, origin will point to git@github.com:apetenchea/cdroot.git. You can check what the remotes of
your repository point to by running git remote -v.
You can always inspect the current state of your local branch by running git status. If it’s synchronized with the remote, you’ll see
a message like this:
1 | On branch bug-fix/issue-18919 |
In the example above, bug-fix/issue-18919 is the name of the local branch, and origin/bug-fix/issue-18919 is the name of the
remote branch. Remote branches always reflect the state of the branch on the remote repository.
The naming convention is <remote-name>/<branch-name>.
pull
You can’t work on remote branches directly, as they can just be updated from the remote.
However, you can pull changes from them into your local branch. This is done by running git pull <remote> <branch-name>, or simply
git pull if you’re already on the branch you want to pull changes into. This will fetch the changes from the remote branch and merge
them into your local branch.
fetch
If you want to fetch the changes without switching to that branch, you can run git fetch <remote> <branch-name>:<branch-name>. This
will bring the local representation of the remote branch into synchronization with the actual remote. Note that git pull is just a
shorthand for a fetch followed by an additional merge step.
When using fetch, one could, for example, create a new local copy of the remote branch by running git fetch origin bug-fix/issue-18919:bug-fix/copy-of-issue-18919.
Simply running git fetch without any additional arguments will fetch all the changes from all the remote branches. Adding
--prune will also remove any remote tracking branches that no longer exist on the remote (stale branches that have probably
been merged long ago and deleted): git fetch --prune.
If you’re behind a slow network connection, this may take a while.
push
Finally, git push is used to publish your local changes to the remote repository. If you’re pushing a new branch, you’ll have to
specify the remote branch name as well:
1 | git push origin <local-branch-name>:<remote-branch-name> |
Note that git forces you to incorporate the latest changes before pushing. This is to ensure that your push won’t
overwrite any commits on the remote branch that aren’t present in your local branch, which could lead to loss of work.
However, there may be times when you intentionally want to overwrite the remote branch, as for example, you may have
rewritten the commit history of your local branch. This is where git push -f comes into play, telling git to forcefully
push your commits, even if this means overwriting commits on the remote branch that aren’t in your local branch.
As a side note, push does not necessarily imply that new commits will be added to the remote branch, but rather that
the remote branch will be updated. For example, git push origin :bug-fix/issue-18919 will delete the branch from the
remote.
Merging
Merging is the process of combining two branches into one. In git terms, the branch that receives the changes is called
the target branch, while the branch that is merged into it is called the source branch. Merging creates a special
commit called a merge commit. The special thing about it is that it has two parents:
the last commit of the target branch and the last commit of the source branch. The target branch is updated to point to the
merge commit, while the source branch remains unchanged.
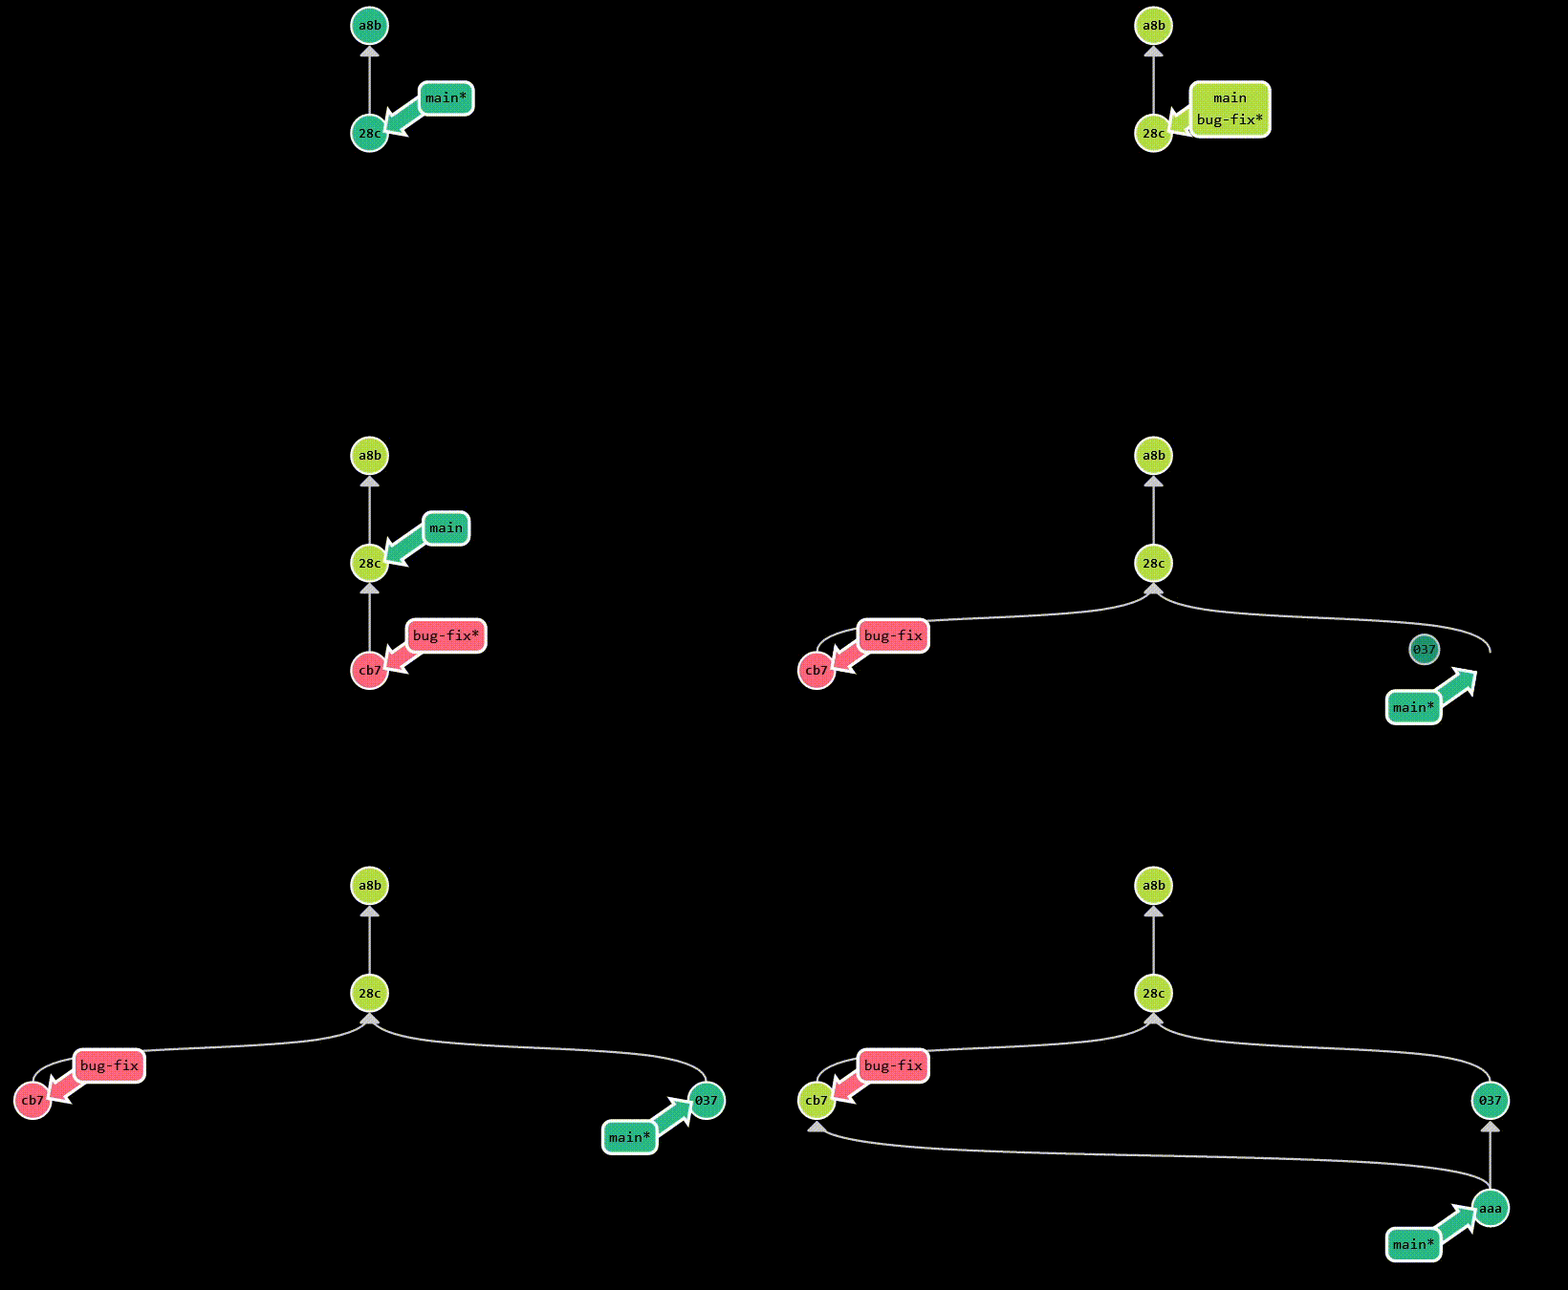
In the example below, we branch off main to create a new branch called bug-fix. Then, each branch diverges, as we make
new commits: c7b on bug-fix and 037 on main. Finally, we merge bug-fix into main, which introduces a new commit
(aaa) that has both c7b and 037 as parents. Assuming main is the current branch, this is the equivalent of running
git merge bug-fix.
Rebasing
Rebasing is the process of moving a branch to a new base commit. It essentially takes a set of commits and copies them
somewhere else. The new base commit is usually the tip of another branch. Rebasing is a powerful tool that can be used to
rewrite history, but it’s also a dangerous tool, as it can easily lead to conflicts. Nevertheless, it makes your commit history
appear cleaner and more linear, which is why it’s incorporated in the merging process by a lot of software projects.
Personally, I don’t have a strong preference, as long as a consistent workflow is followed for the entire team.
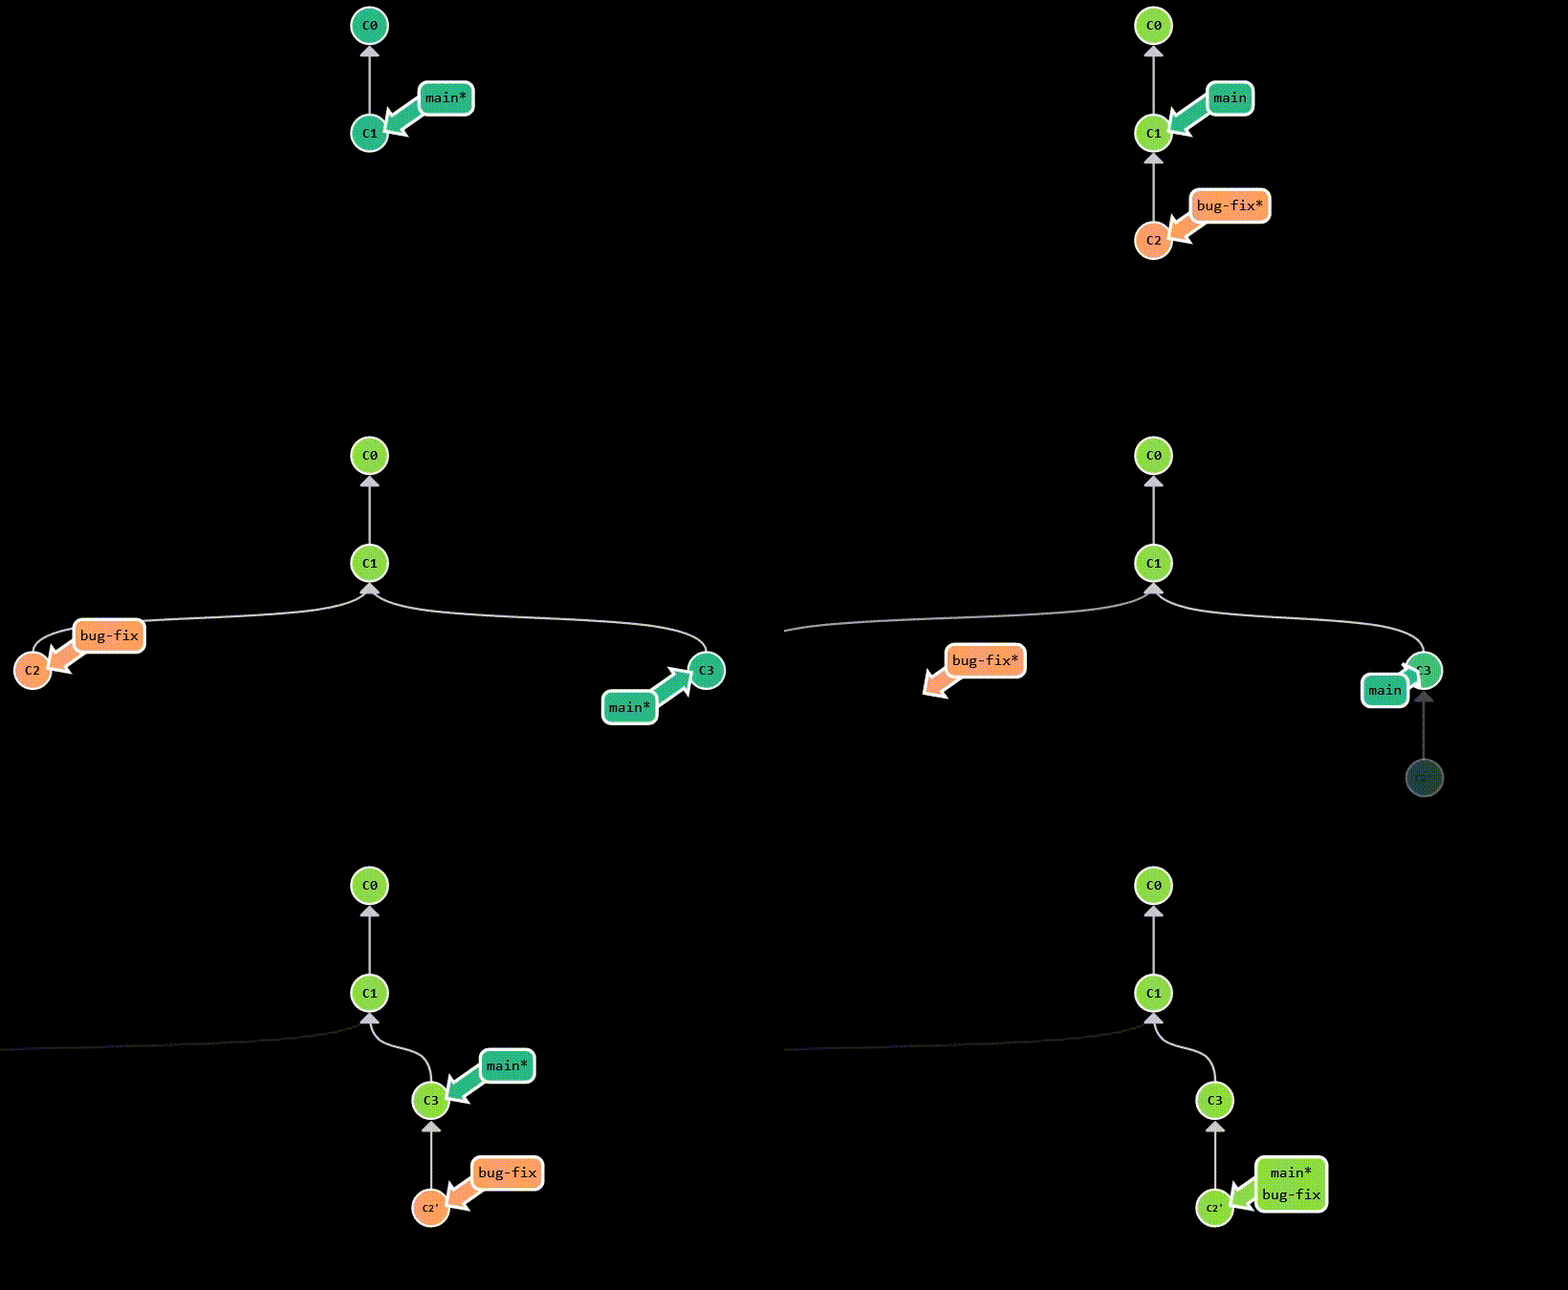
In the example below, we branch off main and create a new branch called bug-fix. Similar to the merging example, each branch
diverges, but this time, before merging, we are going to rebase bug-fix onto main. This means that we are going to copy the commits from bug-fix
and place them on top of main, which moves the point at which bug-fix was branched to the last commit from main. After rebasing,
we can switch back to main and merge bug-fix into it. This will result in a fast-forward merge, as bug-fix is now a direct descendant.
The resulting history is linear, appearing as if we were working on main all along. Assuming that bug-fix is the current branch, this is the equivalent
of running:
1 | git rebase main |
Moving around
By moving around in git, I mean the ability to traverse up and down the commit tree that represents your project.
HEAD
You can think of HEAD as a pointer to the current commit. It’s a symbolic name for the commit you’re working on top of.
Normally, it points to the tip of the current branch, but it can also point to a commit, in case you have
checked out a specific commit instead of a branch. When HEAD refers to a commit, as opposed to a branch name,
it’s said to be in a detached state.
You can check what HEAD points to by inspecting the .git/HEAD file - it will either contain a reference to a
branch name or a commit hash.
1 | git checkout main |
If you just want to get the hash of the currently checked commit, regardless of the HEAD’s state,
you can run git rev-parse HEAD. Nevertheless, the whole point of using HEAD is to avoid having to deal with
commit hashes. For example, let’s take a look at the recent commit history of the
python-arango project:
1 | git log -5 | grep commit |
As I’m writing this, HEAD points to the default branch, main, whose tip is the first commit in the list above.
Luckily, git provides relative refs, which are a very powerful way of referring to commits relative to another point
of reference, such as HEAD or a branch name (remember that a branch is just a pointer to a commit).
caret (^)
Each time you append a caret to a ref, you’re telling git to traverse one commit up the commit tree. For example,
HEAD^ is the parent of HEAD, HEAD^^ is the grandparent of HEAD, and so on.
1 | git rev-parse HEAD |
You might be wondering what happens when you append a caret to a commit that has multiple parents. In this case,
you can specify which parent you want to traverse to. For example, HEAD^2 is the second parent of HEAD. The default
is the first parent, so HEAD^ is equivalent to HEAD^1.
To wrap it up, you can use the caret to refer to any commit in the commit tree, as long as you know its position relative
to another commit or branch. This is very useful when you want to check out a specific commit. The following commands
are all equivalent and will check out the commit with hash 0dc641e:
1 | git checkout HEAD^ |
tilde (~)
You might have noticed that the caret is useful to refer to commits in the immediate vicinity of another commit or branch.
However, it might look awkward to use it when referring to commits that are further away. For example, if you want to refer to
the 5th parent of HEAD, you would have to write HEAD^^^^^. This is where the tilde comes in handy. It’s similar to
the caret, but it’s used to refer to the nth ancestor of a commit. For example, HEAD~5 is the 5th parent of HEAD.
The following examples all refer to the same commit:
1 | git rev-parse HEAD^^^ |
cherry-pick
I think this little command is one of the most underrated features of git. It allows you to pick any commits from anywhere
in the commit tree and apply them below your current location (HEAD). This is very useful when you want to apply just a
couple of commits from a branch to another. For example, let’s say you have a branch called feature that contains
3 commits: C2, C3 and C4. You want to apply C3 and C4 to your current branch, but not C2. You can do this
by running git cherry-pick C3 C4.
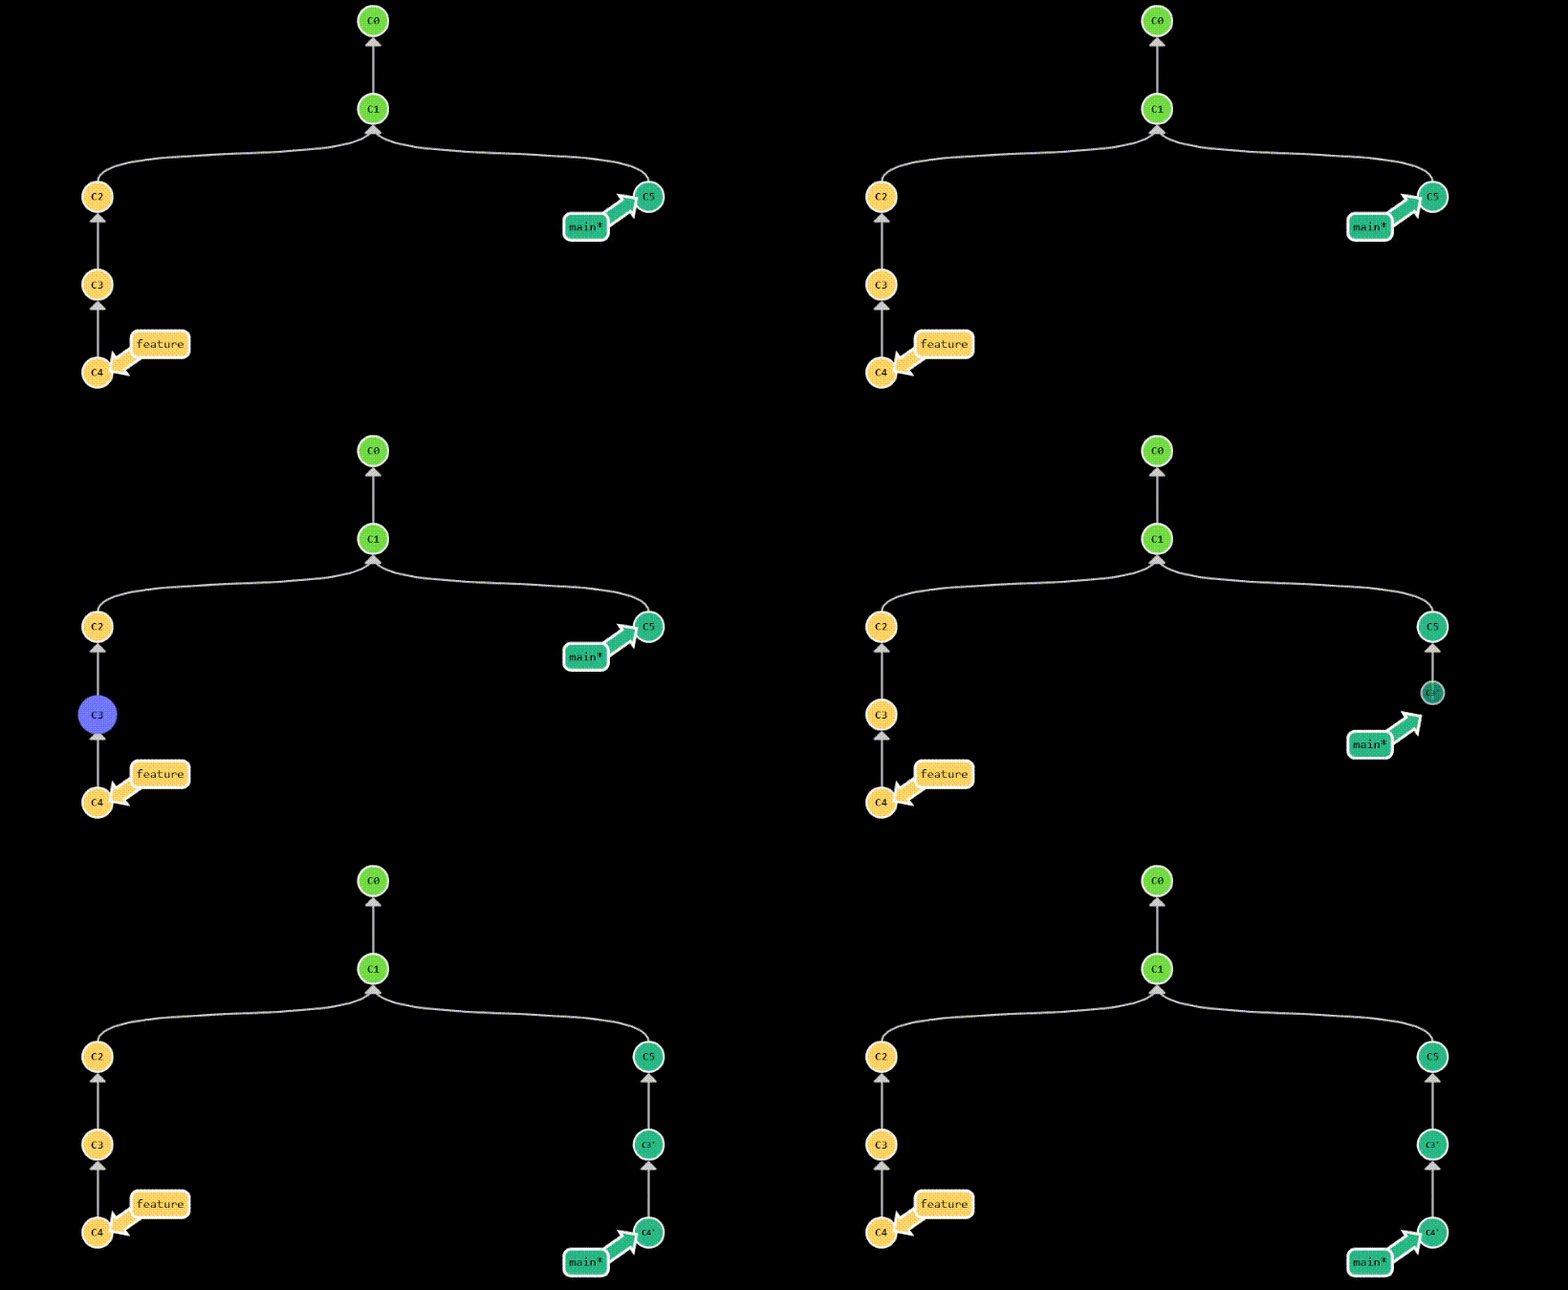
Two popular use cases for git cherry-pick are:
- applying a hotfix to a release branch
- doing backports to older versions of your software
Undoing changes
What if you realized that you made a mistake in your last commit? Or, you might have simply changed your mind about it. As with most things in git, there are multiple ways to go about this.
reset
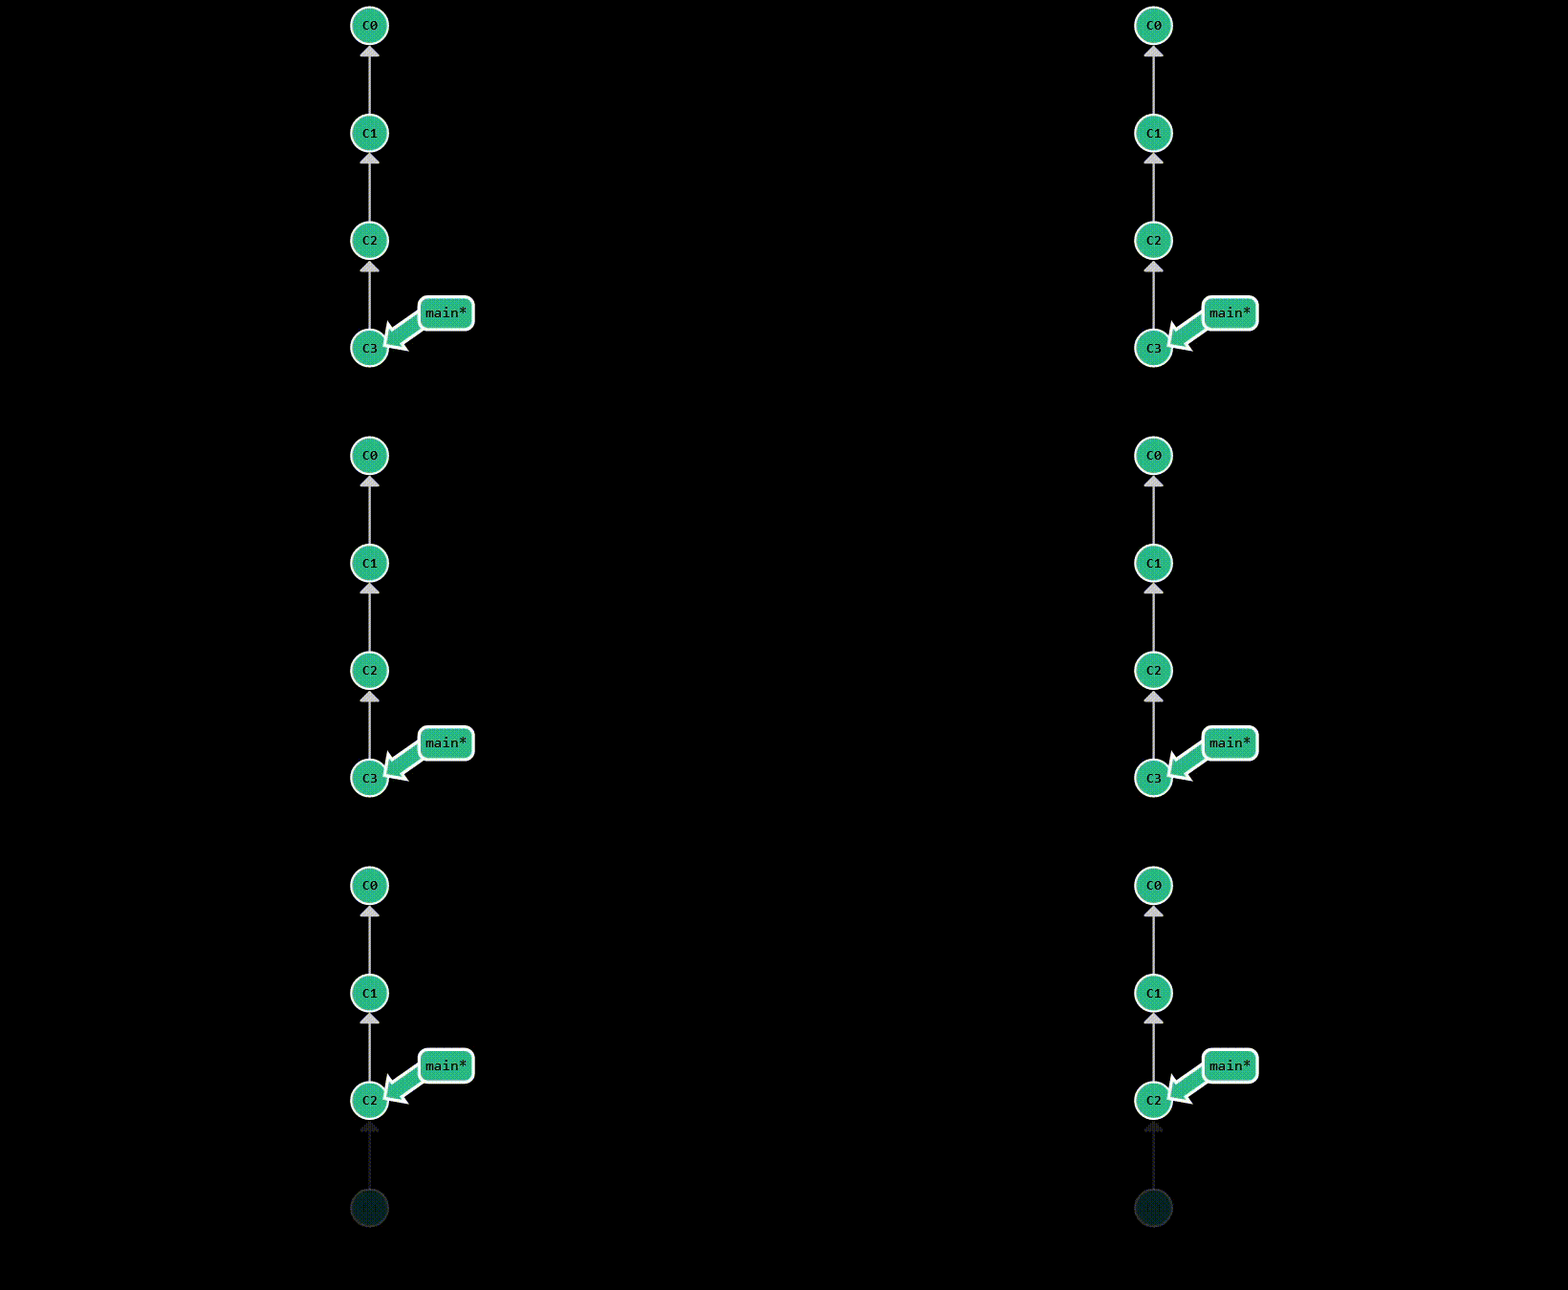
git reset is used to move the HEAD pointer to a specific commit. Assume you’ve made a mistake in your last commit,
and you want to go back to the previous commit. You can do this by running git reset HEAD^. This will move HEAD back one commit,
while keeping the working directory untouched, allowing you to make the necessary adjustments and commit them again.
This is equivalent to running git reset --mixed HEAD^, as it will un-stage the changes from the last commit,
but keep them in the working directory.
If you just want to move HEAD without affecting the staging area or the working directory,
you can run git reset --soft HEAD^.
The most destructive form is git reset --hard HEAD^, which will move HEAD to the parent of the current commit and
discard all changes from the current commit. This is useful when you want to completely get rid of a commit, but you
should be careful when using it, as it permanently deletes your modifications.
As a general rule, it’s ok to use git reset on branches that only you have seen or used, but it’s not a good idea on
public branches where others may be collaborating with you. This is because git reset can rewrite the commit history,
which may cause conflicts and confusion for other collaborators.
To better illustrate the differences between the three forms of git reset, let’s assume we have the following commit history
of the same python-arango repository:
1 | git log -2 | grep commit |
Suppose I modify tester.sh and stage it. Then, I modify setup.py, without staging it. This is what git status shows:
1 | git status |
Finally, I commit my changes (note that only tester.sh will be included in the commit), git commit -m "test":
1 | [main da589a1] test |
Then, git status shows the following:
1 | On branch main |
–soft
Now, running git reset --soft HEAD^ leaves the project in the same state as before I committed - tester.sh
staged and setup.py modified. See git status below:
1 | On branch main |
–mixed
git reset --mixed HEAD^ leaves the repo in the same state as before I staged tester.sh - two modified files and nothing staged.
See git status below:
1 | On branch main |
–hard
Finally, git reset --hard HEAD^ leaves the repo in the exact same state as before I made any changes -
no staged files and no modified files, therefore erasing all my work.
See git status below:
1 | On branch main |
revert
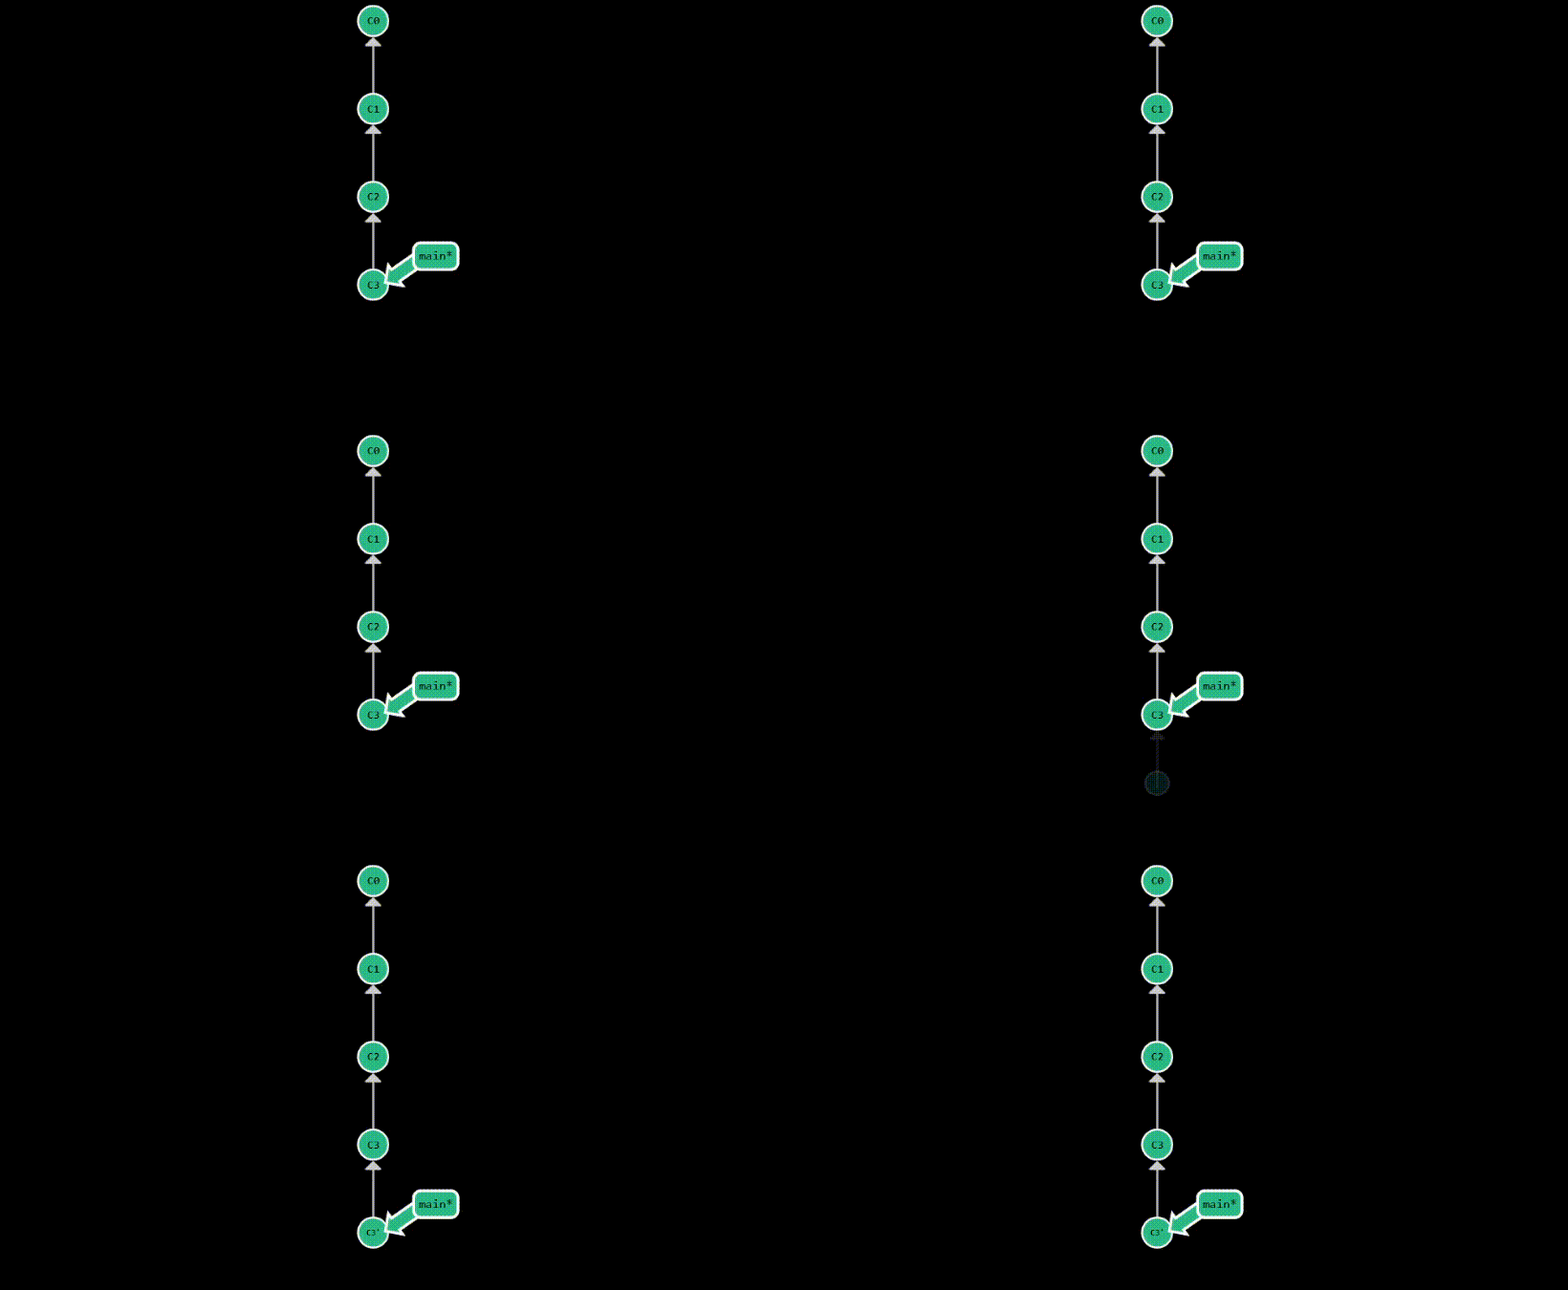
git revert provides a safer way to undo changes on public branches, without rewriting the commit history. Instead,
it undoes the changes of the specified commit, by creating a new commit. Therefore, it appends to the
commit history another commit which essentially cancels the diff introduced by the specified commit.
This is useful when you want to undo a commit that has already been pushed to a remote repository. By default,
it reverts the last commit, but you can specify any commit you want to revert using refs, just like with git reset.
After committing something with the message “test”, this is how the commit history looks after a git revert:
1 | commit 7e3b51649987e13b294c84a561684c3c06a06387 (HEAD -> main) |
Tagging
Branches are easily mutated. You can delete them, rename them, or move them around. This is why they are not a good
way to keep track of releases. Tags, on the other hand, are immutable. They’re like snapshots of your project
at key moments in its history.
To create a tag, you can use git tag <tag_name>, for example: git tag v1.0.0. By default,
it will create a tag for the current commit, but you can specify any commit you want using refs: git tag v1.0.0 feature~2.
There’s mainly two reasons for why I find tags useful:
- it’s easier to remember a tag name (such as
v1.0.0) than a commit hash - lots of release automation tools are based on tags
You can list all existing tags in your repository by running git tag. To push tags to the remote,
you can use git push --tags.
Recipes
Shallow cloning
Some repositories are huge, and you may not need the entire history of the project. For example, if you only plan to
compile ArangoDB, you don’t have to download the entire commit history.
You can speed up cloning substantially and use less disk space by using the --single-branch and --depth
parameters for the clone command as follows:
1 | git clone --single-branch --depth 1 git@github.com:arangodb/arangodb.git |
This is what’s called a shallow clone. The --single-branch parameter tells git to only clone the default branch (in their case devel), and the
--depth parameter tells git how many commits to clone (in this example, only the last commit).
Backports
ArangoDB (and many other software projects) continuously work towards new releases, while also maintaining older
versions. This means that bug fixes and new features are continuously being added to the devel branch, while
some (especially bug-fixes) also need to be back-ported to older versions.
For example, take a look at this pull request which fixes a bug in
the devel branch. I had to backport this to 3 other branches: 3.11, 3.10 and 3.9.
Once I completed my work on the devel branch, I have simply switched to the other branches and cherry-picked the
necessary commits, like this:
1 | git switch 3.11 |
For older branches, such as 3.9, I had do some manual work to resolve conflicts, but it was still much faster than
having to re-implement the same fix 4 times.
Interactive rebase
This is a really cool feature of git, which allows you to rewrite history in a very simple way. It’s typically used
to clean up the mess before pushing to a remote repository: squashing commits, reordering commits, removing commits,
changing commit messages, etc. The “interactive” part means that git will open an interface for you to decide what to do.
For example, you might have a couple of commits that you used for debugging, and you don’t want to push them to the
remote repository. Or, you might have a couple of commits that are related to the same feature, and you want to squash
them into a single commit. I usually use it to squash Work in progress commits.
1 | git rebase -i HEAD~3 |
This will open an interface that looks like this:
1 | pick b82de8c [DE-544] Retriable batch reads (#254) |
The first commit is the oldest, and the last commit is the newest. You can reorder them by simply moving the lines
around. The first word on each line is the action that will be performed on that commit. The actions that I most
commonly use are: pick, drop, squash and fixup.
For details, checkout GitLab’s tutorial
on how to use interactive rebase.
Ignoring files
Of course, there’s the .gitignore file for that. You can specify intentionally
untracked files or patterns that you want git to ignore. For example, you might want to ignore all files with the
.log extension, or all files in the build directory.
However, sometimes you might want to ignore files without adding them to the .gitignore file. For example, you might
have a file that you want to ignore only on your machine, but not on other machines. In my case, I have some
build artifacts that I want to ignore, but I don’t want to add them to the .gitignore file, because these are very
specific to my machine. I’ve added them to the .git/info/exclude file, inside hidden .git folder in my repository.
This file is similar to .gitignore, but it’s not versioned. This means that it’s not shared with other developers,
and it’s not pushed to the remote repository.
Multiple configs
Sometimes, you might want to use different email addresses for different projects. For example, use
your personal email address for hobby projects, and your work email address for work projects. You can
do this by setting the user.email and user.name at the repository level.
1 | cd /path/to/personal/project |
You may also want to set global defaults for your user name and email address, which will be used for all repositories where you haven’t set them explicitly. You can do this by running:
1 | git config --global user.email "my.email@example.com" |